|
By Custom Puzzle Craft |
|
|
|

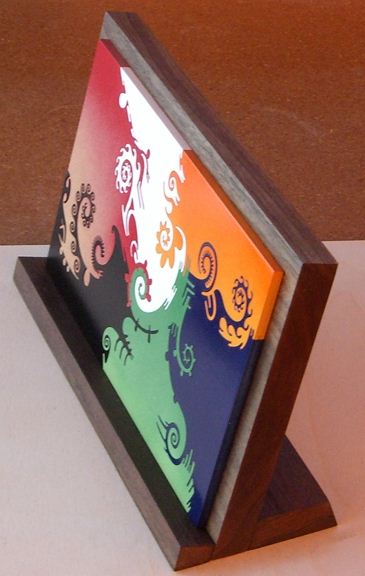
Six Piece Golden Ratio Compulsory #2
|
By Custom Puzzle Craft |
|
|
|
Six Piece Golden Ratio Compulsory #2
This is the third "Compulsory" Art Object I've offered within the 100 Puzzles Project. This work is a "Golden Ratio" Compulsory as the dimensions, 10" by 6.18" are about as close as I could get to the Golden Ratio. See the Wikipedia Golden Ratio entry for more information about the ratio. See Compulsories for information about the origin of the Compulsory name and pictures of other Compulsories.
The first Golden Ratio compulsory I made was an experimental work and is in my own collection of works. While I had done some prior work in exploring the ratio, no works were produced. A customer's suggestion renewed my interest in the ratio.

Six Piece Golden Ratio Compulsory #2 - Reverse Side
The reserve side does not have accent colors and may be considered a bonus work as all you have to do is flip the work over to see it!
As it happened (from my Journal archives)
March 13, 2009
Friday 7:58 pm - I was at the shop for over four hours today. I had some table saw problems, I think the blade needs to be replaced, took five tries to make a suitable board for Six Piece Golden Ratio Compulsory #2. I then cut the three components for the stand. This took more time than planned as the source board was not square and I had a lot of trouble keeping the thick wood square with the saw's t-square - eventually gave up and made some small shims with my scroll saw and taped them to one edge of the board and then was able to get a square cut using the saw's guide bar. I then sanded and tung oiled the three parts.
Tomorrow is my birthday, no work, no posting! On Sunday I'll glue together the stand and cut the Compulsory and if good, paint it.
March 15, 2009
Sunday 3:51 pm - Didn't get to the shop this weekend. I now expect to cut Six Piece Golden Ratio Compulsory #2 tomorrow.
March 16, 2009
Monday 5:56 pm - I cut Six Piece Golden Ratio Compulsory #2 today! It came out fantastic, as good as the first one. I've painted the front, still have to do the back, then another coat on the front and then the accent colors. I'll have a write up and picture tomorrow [edit - see above]. Auction will start Wednesday.
March 17, 2009
Tuesday 9:58 pm - In looking at the picture of Six Piece Golden Ratio Compulsory #2, I realized that the black area does not appear to be "dark enough". I want more contrast. The work is at the shop so I don't know if the way I took the picture is to blame (it was taken in sunlight). If the black is really that light, I'm going to explore looking for a different black and repainting that one piece. The auction will still start sometime tomorrow.
Tuesday 4:21 pm - I spent about three hours at the shop today and completed Six Piece Golden Ratio Compulsory #2. It's a strong work and I think a little bit better than the first one, as all of the sections relate to each other better, while the first one had some areas of chaos. I used the identical paint scheme as the first one.
I'll have more to say about the new work when I launch the auction for it, tomorrow. One thing that is impressive about the new work is that I did not cut anything whatsoever for 36 days (I completed the cutting of #823, The World, on February 8 and cut the Compulsory yesterday March 16); I went into it absolutely cold, no warm up cutting!
I checked the bird nest out front and yes, there is a Mourning Dove in it!
Yesterday a Mourning Dove got into the common room at Mixed Media, it was flying around banging into the windows. Myself and two others tried to coax the bird out the door but it would just fly to the nearest window. Eventually I decided I was going to try to catch it in a small canvas bag. I very slowly approached the bird and when I was about a foot away decided to very, very slowly advance my hand and when it was about four inches away from the bird I made a lighting grab and caught the bird with one hand! The other two watching were quite surprised as they didn't know I was going to try and snatch it with my hand! I let the bird outside near the solar fountain. It went onto a small bench where it stayed for several hours, eventually joined by another bird. Later they flew away, no damage done.
March 18, 2009
Wednesday 10:59 pm - Despite my best efforts, I can't get the auction launched today, not enough time - will now be a five day auction starting Thursday afternoon, Pacific time.
Wednesday 5:04 pm - Went to the shop and looked at Six Piece Golden Ratio Compulsory #2. The black area was clearly not dark enough. It was a "flat" black. I purchase both "semigloss" and "gloss" paints, experimented with scraps of wood and decided semigloss would look fine. I then redid the black in Six Piece Golden Ratio Compulsory #1 (the official completion date of last year will remain unchanged), then redid the black in Six Piece Golden Ratio Compulsory #2, moving up the official completion date to today. It looks a lot better.
I have written one of the most detailed write ups ever about the thought processes I had when I created this work. I have a huge amount of editing to do. The auction will be launched today, it has to because of an upcoming trip, but it may be very, very late tonight.
March 19, 2009
Thursday 5:10 pm - Auction launched. I have included a long description of the thought processes I had while cutting . When I create a separate webpage for this puzzle, I'll copy the description to that page for long term reference. Due to time constraints this is a FIVE DAY auction.
From the auction description:
This month's puzzle features an incredibly well made "Compulsory" a work of art in this case limited to just 5 elaborate cuts resulting in 6 pieces. This work measures 10" by 6.18" (a "Golden Ratio"). Each of the pieces were painted on both sites with acrylic spray paint. The work was cut in about two hours on March 16, 2009 painted March 16, 17 and 18, and written up on March 18. The stand, made from Walnut, was made earlier in this month. This is an actual wooden jigsaw puzzle, the pieces may be taken apart and put back together!
My cutting requirements for Golden Ratio Compulsories are not as strict as for my six piece 3" x 9" Compulsories. The basic requirement is that the puzzle be cut with no patterns allowed, must be freeform - cut as continuously as practical. Some "classic" spiral structures have to be included in the work with an emphasis on "harmonic flow cutting" or "puzzle feng shui". Puzzle art is a dance where all steps are recorded, to be displayed simultaneously forever, nothing can be undone.
This work was made using 5-ply Appleply - the wood cut extremely well.
The wooden display stand was made from 3/4" thick Walnut. The wooden stand is made from three pieces, glued together with wood glue, there are no nails. Some of the inspiration for the design of the stand, came from those slanted Tyrell Corporation buildings in the movie Blade Runner.
The green piece is signed along the bottom and is also marked indicating this is the 87th puzzle of the 100 Puzzle Project.
This puzzle will be shipped assembled, shrink wrapped against a backing board, along with the stand.
Detailed description of the cutting process:
This write-up was included in the auction description and has since been edited.
What follows is a long description of the thought processes I had while I cutting this work. I've been meaning to write something like this for some time and finally have gotten around to it!
First Cut


The first cut started at the top between the eventual white and orange sections. I wanted to start out fairly simple, with a couple "double prongs" curving to the right, and lifting up to suggest life, not drooping down. The spacing in the second double prong was wider than I wanted, but that is the way of the saw, and in this art form there is never any going back, rather adopting and adapting. After the second one, I "pronged up" to the left, then a knob and then a smaller prong to the left in harmony with the first one and balancing the double pronged projections to the right. This was the first scroll saw cutting of any kind that I had done in 36 days and provided a bit of a warm up for the intricate work ahead.
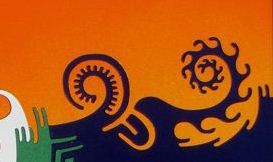
Now was time for the first fancy spiral. I decided to do a "wavy curl spiral" like the black one in the first Golden Ratio compulsory I did (pictured on my website under Art Objects, at the bottom). Each note (the individual tine / prong / scale associated with an adorned curl) here is a rounded curve worked from the interior of the spiral on out. The notes in this variant of the wavy curl spiral are formed by moving away roughly vertically from the spiral's edge and then looping back to nearly parallel to the spiral's edge further on down and then repeating. By repeating the same relative hand motion as I work out my spirals I usually manage to come up with successive notes which are reasonably proportioned to each other. I should mentioned that no templates are used for these "Compulsory" works, none are allowed, although I can refer to prior art lying nearby. I had some slight control problems at the start of the adornment for this spiral, but things then settled down, the wavy curl spiral came out fine, 14 notes, nice.
What to do next? I wanted to get back with the task of cutting the board in half, with the goal of doing a nice big "tread gear spiral" as this spiral was to play a key roll in the work. I decided to cut a long curl ending as the spiral, but the line started too far to the right, so I employed a standard strategy of "back and forths" (where the green begins next to the white), ending with the line moved towards the center by virtual of curving the back and forths to the left plus the displacement caused by exiting on the left side of the back and forths after starting on the right side. It is key here that the lines line up, producing a smooth flow. I then spiraled in and began to "tread gear" on the way out. Tread gears are unusual structures in that the "notes" go inward like the notches within the tread wheels of an army tank. The tread gear is one of my favorite structures because I can work off of it later as will be seen here. 13 notes (notches) here. Again at the end of a spiral structure the moment of maximum creativity is required - deciding what to do next.
The journey to the bottom of the board continued. Here what to do next was a no-brainer as I love installing spikes on the "other side" of the notches - here backtracking and cutting two knobs to make for the illusion of spikes. After two of these I really had no idea what to do - the subsequent curve was too tight to adorn - so out came three little notches then the idea to do another double prong - a leitmotif I frequently use in my works. Then quickly I seized on the idea of "spiking" the three notches but with curves. Almost done. The work needed a nice plain spiral, a sway curl and then done!
Second Cut
My works in this series allows for just five cuts, resulting in six pieces. I decided to work in the right hand half first as it was a little smaller and I was feeling lazy. After the first cut, subsequent cuts can start from the interior or from an outer edge. I just about "always" start them from the interior as I want to play off something I've already cut, making the starting point blend in with the prior work. The second line here ended up defining the rest of the shape which was to be painted yellow orange. I started where the white, green and orange meet - by extending the "back and forths" one more note then traveling further upwards, cutting another double prong (green against the orange), curving towards the upper white double prongs and harmonizing the curve of the white structure. Of course nothing was painted at this point, I'm referring to the colors here for better understanding of what line I'm talking about.
After the double prong came a key decision point. The goal was to cut the section into three pieces. I could continue to work down towards the lower right forming what would become the green piece first or cut across to the right forming the yellow-orange piece first. What I did was to go to the right and only much later came back to the same decision point and cut down, it is almost impossible without closely examining the work to know which came first!
In the first cut, the wavy curl spiral and the gear tread spiral were both clock-wise spirals, so here I decided to balance this with some counter-clockwise spirals. It was time for a "gear tooth spiral". (Note, I cut a "gear tooth spiral" in the magnificent collaboration "Full of the Dickens" puzzle owned by Bob Armstrong, he calls this kind of spiral a "cog wheel" spiral, pretty good name!) The gear tooth spiral provides a nice counterbalance to larger softer lines and in my Creative style puzzles I sprinkle them around. Variations in the wood, the blade and my turning skills result in an obviously hand cut work, there are always subtle variations in the size, spacing and angles of teeth within these gears - still this one came out "pretty good" - 19 teeth a bit on the low side for one of these. When I finished it, I decided that the overall size of the structure was on the "wimpy" side - it looked small compared to the space above it - so I decided to go back and cut a larger curve around the outside of it and then come back. When coming back I could have embellished the second curve with another fancy motif but decided I wanted something smooth and came back without further developments.
What follows is an interesting little structure. I made a single prong in parallel with the line which formed the interior of the gear tooth spiral and then decided to acknowledge the end of the gear tooth spiral's "encasing curve" with a little prong to the lower right. It came out not quite at the angle I wanted - longer and further to the right would have been nice, so I "averaged the error" by encasing it too, and ending with a tip pointing to the end of the first encasement, providing better balance in the general area. Now I was ready to leave for the next spiral.
Again I wanted a counter-clockwise spiral, to bring the balance up, and more importantly, curve in from the edge, you can see most of my spirals curve in from the edges. I decided it was time for a nice "parallel curl spiral". In a "parallel curl spiral", after spiraling in, each note on the way out is a small curl which curls inward toward the main spiral only to the point where its ending tip is parallel to the main spiral - in other words "a 180 curl". Each curl note increased in size as I worked out from the center (I have done them keeping the curl size constant). The cool thing is that the set of curl tips form a nice flow, paralleling the main curl. I worked out as far as could then again reached the "what to do next point". 18 curl tips, very nice. I wanted to get to the end of the cut, so I employed a method I came up with a year or so ago, a traveling zig-zag playing off the outer edge of the parallel curl spiral. The edge of the board scuttled any chance that the zig-zag might be continued around the structure, something I have done elsewhere. Good decision to terminate where I did, would have made the upper right too busy.
Third cut

I started at the junction of orange, green and dark blue, cutting down, extending the right side of the green double prong to match the left side. You'll need to refer to the picture of the whole work for some of this discussion. With the third line in progress I now had two prior lines to harmonize with. I cut a prong to the right paralleling the line heading for the gear tooth curl and acknowledging the yellow-orange prong coming in from the other direction, then back and down to extend the other line, following by a series of horizontal and vertical lines continuing a general acknowledgement process. After the third tip to the right, freedom and onwards to the next spiral. Time for a "bubble curl". Bubble curls are very straight forward: spiral in and bubble out! With many adorned curls there are a wide ranges of options. For a bubble curl for example, the knobs could remain the same size as they are formed, they could be same sized knobs alternating with increasing sized knobs, the spacing could remain constant, could vary, could even alternate with tank tread notches, be squares or triangles, I've done all of these. I've also done "bubble runs" where usually an odd number (3 or 5) bubbles are grouped together in a fairly straight line run. Bubble runs frequently appear in my Creative style puzzles. In this case, 10 bubbles, nice.
Next, a few more prongs to acknowledge the previous structure. The angles and flow formed here could have been better; I added the little cut to the diagonal left to exit out of the quandary and at the same time say "hello" to the long prong with the two spikes formed by the center gear tread spiral.
Onwards to the bottom. After those prongs with somewhat straight lines, I wanted a nice long curving / sloping line. On the way, two echoes of the bubble curl showed up. Then into a big nice lazy spiral! The green spiral is fatter than the dark blue spiral, another hint at the wide range of choices that are available. I spiraled in and then on the way out something very interesting happened. I felt a very strong attraction from the black double prong with the three curved spikes to the left. Four times the blade was "pulled" to the left, as if a great black hole was pulling matter from the gentle spiral. The spiral held and I was then ready to start the last structure before exiting the cut.
I was going to spiral out a little further than I did, but I noticed that I curved a little bit further to the left than I wanted to and had I continued on, the width of the spiral would have narrowed dangerously plus would not look good; I didn't want an unwanted inflection point, they almost always look bad. An immediate change of plans. Here a thought came to me to do something like an uplifting Art Deco building sketch from the 1930's. I started a chain of higher "buildings". The third one had a tip which angled slightly down towards the lower right, almost in effect continuing the long spiral line with the two knobs, so I changed course, I decided to go with that idea, angling down towards the lower right, to the conclusion.
Fourth cut
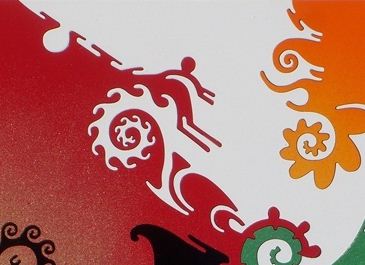
The fourth cut separates the white piece from the red piece
I started out from the central feature of the work, the green tread gear curl. Three red spikes and then one white "reverse spike". The reverse spike is formed by passing to the far side of the notch and back tracking with a spike. An embellishment I've developed is then to bounce back to the far side again and then to the near side in a series of increasing jumps. I was being a bit "loose" here and after third one, realized the prong was was off to the right, so to "fix" that I formed a "flat top" knob to extend the overall structure then doubled back to the left to put in a thin parallel prong to fill out the overall structure. Once that was done it was time to get out and on with the next fancy curl.
Here I decided I wanted to do another "parallel curl spiral". I'm not sure I've ever put two in one Compulsory before. So I cut a nice round spiral and then worked back out as usual. 17 notes this time, a really nice work. Here I reached the next "what to do" point. I liked the flat line created by the "flat top" knob and so I created a long (red) prong near it to celebrate it. Then a second one with the intervening white space angled at its tip to acknowledge the angle formed by the parallel curl spiral. At this point it was time to get on with getting the cut done. Like the first parallel curl spiral, I thought of doing a traveling zig-zag but instead ended up doing a curve with a double prong echoing the first longer one, not quite angled as parallel as I wanted.
Then came an artistic impulse out of the blue, a nice plane knob! There were no solo knobs in the work so far and solo knobs, like gear curls (my shorthand for "gear tooth curls"), provide for a nice counterbalance in the work. That out of the way, I did one traveling zig-zag associated with the parallel curl spiral. Then a "strong force" took hold, the second time this happened (the first being the force which pulled at the big blue spiral in the lower right). The set of parallel lines formed around the flat top knob were like a rocket launch tower and launched a diagonal projection to the upper left. But in the midst of the rapid movement a second bigger knob appeared, adding fluidity and helping to bring out the first knob created just moments earlier. Some of the lines here are a bit thinner than I wanted.
Fifth cut
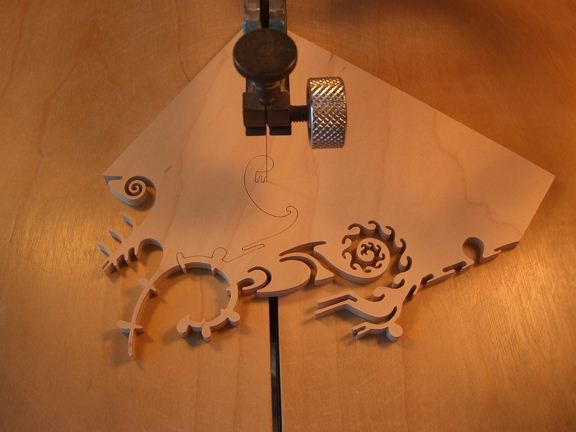
Photo of the fifth cut in progress, paused
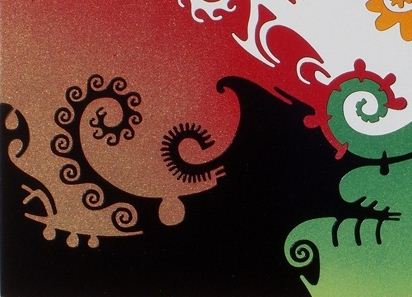
The fifth cut separated the black piece from the red / gold piece. I started with a couple spikes (red) at the tread gear spiral, completing an excellent area of cutting. From there a black prong to acknowledge the set of lines headed toward the upper left. I had already decided that I was going to do one of my fanciest spirals, a "same direction curl spiral", but first I needed to get to where I could do one without interference from other structures. I wasn't sure what to do and out came a very muted curl. I then seized on doing a another gear tooth spiral on the way to getting where I needed to go. I decided to make the teeth longer to make for a bolder figure - during the way I encountered "trouble" curving the structure and it swayed out a bit, not intentional but these things happen. I could have kept going with the teeth to the right but felt that the structure was already getting to the point of being prominent enough so I ended it with a small double prong, echoing the gear's initial teeth with an inverse. The double prong could have turned into the start of a second gear tooth spiral cut with the teeth spiraling down and in, clock-wise followed by a smooth line spiraling out - I have done this - a rare thing to to cut an adorned spiral "backwards", but that would have distracted me from and perhaps ruined the chance to do the "same direction curl spiral".
Now I was ready for the big curl. On the way, the previously cut big white knob (unpainted at the time) exerted influence and another nice big knob burst on the scene. The "same direction curl spiral" takes intense concentration to cut well. Each note on the way out is a small spiral curl whose end must point in the same direction as the tip of the main spiral. (This requirement is one of the origins of the "Compulsory" idea. The word "Compulsory" itself was adapted from the former requirement of skating "Compulsory" figures within in Olympic figure ice skating competition.) So when cutting a little spiral, I have to guess how much space is needed beforehand so the little spiral's tip ends up pointing in the same direction as the tip of the main spiral without desperately cutting a super thin curl at the risk of ruining the work or leaving too much room! I usually include one or two of these structures in my major Creative style puzzles. This one came out looking excellent. Success is not guaranteed! When cutting, there are no colors or templates to follow and it is possible to get disoriented as to which curl (e.g. the black one or the gold one) is the one I need to be following to get the end pointing the right way - the problem gets worse the deeper the curl! 15 curls, quite a lot for one of these!
Now at last the cutting was almost done. A simple bubble run. The second bubble came out a bit bigger than I wanted, so I decided the third one would be "different" too (not evenly spaced). After that, to-spike or not to-spike. No, I wanted a second prong near the end of the first prong, like pincers, then I decided to make a sharp turn to the left and make a suggestion of a spike. After wrapping up that structure I came very close to the edge of the board, I wanted one more something to fill the space and cut a modified "mushroom reversal" - a curl, a mushroom cap and a reflected curl, then done!
Painting
I decided to use the same scheme of colors as I used for the first Golden Ratio Compulsory - so no dynamic decision making required here except for deciding how much accent coloration I wanted (red on the gold piece, dark green on the light green piece, orange on the sun-yellow piece).
|
Name
|
Six Piece Golden Ratio Compulsory #2 | |
|
Artist
|
John Stokes | |
|
Date Completed
|
March 18, 2008 | |
|
Size
|
10" x 6.18" | |
|
Cutting Style
|
||
|
# Pieces
|
6 | |
|
Color Line Cutting
|
n/a | |
|
Figurals
|
n/a |
© John S. Stokes III - Puzzle Crafter & Webmaster
|